Thursday, May 30, 2013

Repairing cross-linked plastic kayaks

Some whitewater kayak manufacturers used to use cross linked plastics in their boats. These days (almost) everyone uses linear plastics. What's the difference, you ask. Not a lot. Cross link is a little stronger for its weight so many considered it a better material. But there were a couple problems with it. First, it's often stiffer. That can be good but it can also be bad. Stiff boats don't flex on impact and so they can break where a softer boat will just bend. Another big downside to the cross link is that it can't be welded, so when it does break there isn't (or wasn't) a good way to repair it. But the real problem was that cross link is more expensive. That, added to the fact that customers can't tell the difference between the two, is what really led to the disuse of cross link.

But there are still cross link boats out there. Jackson Kayaks was using cross link up until a couple years ago. I have a couple cross link boats. And I recently managed to crack one of them - my Jackson Villain S. The boat is now in its fourth season and that's all I reasonably expect to get out of a creek boat, so no complaints that it cracked. It happened when I boofed a six foot drop and landed on a hidden rock - probably could have broken a new boat doing that. (just an aside to all you whitewater kayakers out there - just because a boat cracks doesn't mean its defective. If you abuse your gear - and that's a part of this sport - it may break. Yes, sometimes its the manufacturer's problem but sometimes it's the user's fault)

If you read my last post you'll know that I've ordered a new kayak to replace it (the new one is linear, btw). But I don't want to just give up on my old friend. It may be past its prime (so am I) but that doesn't mean its ready for the recycle bin. These days, we have the technology, we can rebuild it. And it doesn't even cost six million dollars.

Before I get into the nitty and gritty, let me talk a little about repairs. When a boat has a leak you can plug that leak up - that's not a repair. Duct tape, Gorilla tape, bituthene, aquaseal, lexal, chewing gum - all will plug a hole and some quite well. But they don't give the boat any structural support. And they don't really stick to the plastic so they are temporary (though that may actually mean years). That's fine if you just want to stop a leak, but if you're using the boat on hard whitewater then you will be using a boat that is not as strong. It will be prone to more cracks and a possibly catastrophic failure in a pin situation. Not a good idea. You are better served if you can actually fix the crack instead of just plugging it up.

As I said, plastic welding is not an option with cross link. I've tried it just to make sure. Plastic welding works by heating the plastic until it has a gooey consistency. Then you add in more heated plastic and mix it together to close up the crack. When the plastic cools it becomes solid again and the hole is gone. But cross link plastic doesn't get gooey. It goes from solid to liquid - it starts to run like water if you heat it too much. But there is relatively new material that can solve the problem: G/flex Epoxy.

The problem with most epoxies and glues is that they simply don't stick to plastic. But a few years ago West Systems came out with an epoxy that does stick to plastic. It also can handle more flexing which is very necessary when fixing a boat that's designed to have some flex. So here's how I used G/flex to fix the crack in my Jackson creek boat.

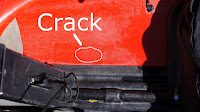
First, my crack was a small one. About an inch and a half. It was in front of the seat and slightly off center which may it easy to access. That allowed me to do the repair from the inside but it could also be done from the outside. Inside is better since it will leave more plastic on the side getting hit by rocks and it also looks nicer.

Step 1: Drill out the crack. The first thing to do with any crack is to make sure it doesn't spread. The way to do that is to drill out the ends of the crack so each end becomes a little circular hole. It may be counter-intuitive to make your problem bigger, but the stress on the seam of a crack makes it likely to split further. By drilling a circular hole you spread the stress out with no weak point so the crack won't grow larger. Even if you just want to stop the leak with some tape you need to do this.

Step 2: Prepare the crack for the epoxy. You want to give the epoxy some good surface area to grab onto. If you just pour epoxy into a crack it won't necessarily have good purchase everywhere and the bond will be weaker. Improve the strength by scraping out more plastic so that you have a divot instead of a crack. I like to think of it as making a little wedge-shaped canal to fill up with the epoxy. I use a knife blade and just carefully scrape away at the crack, making sure not to go all the way through the plastic and trying to avoid creating any stray scratches.

Step 3: Prepare the plastic for the epoxy. Cross link plastic doesn't get soft when you heat it but it does change. I can't say exactly what's going on in there but when you heat it up you will see that it takes on a certain sheen. In this state it is easier for the epoxy to bond to the plastic. So after creating your canal (and cleaning it out good with some rubbing alcohol), get out the heat gun. If you don't have a heat gun use a hair dryer. If you don't have a hair dryer use something hot. A warm day and direct sunlight doesn't really do it.

Step 4: Prepare the back side. It's easy to forget that the epoxy might leak through the crack. So on the side you are NOT working on it's good to tape up the crack so it doesn't drip down onto the floor. You can use tape but I like to use either wax paper or saran wrap. Epoxy doesn't stick to either of them so it's simpler to take off. Use some painter's tape to put a saran wrap patch over the crack - make it as tight as possible - and you'll have an easy time removing it when all is said and done.

Step 5: Add the epoxy. G/flex is actually really easy to work with. Like most epoxies, it's a two part system: the epoxy and the hardener. Follow the directions but the stuff I used just requires a 1:1 mix of the different parts. Mix thoroughly and give it a minute to start reacting. You'll now have a limited amount of time to work with the epoxy before it hardens. Working time depends on temperature but G/flex has a good working life and you should have at least a half hour to play with - and it should only take a couple minutes. I use a Q-tip to transfer the epoxy into the crack but anything will do. Try to keep this neat since excess epoxy is actually a bad thing - not just from an aesthetic stand point. If you make a wide swath of epoxy it will be more likely to crack. You want to just fill your canal completely with maybe a little extra that can be sanded down if necessary. (note: my old boat had some additional cracks that did not go all the way through the hull. I scraped them out and added some epoxy as a preventive measure)

Let it dry for 24 hours and you should be good to go. You can use sand paper to smooth out any rough edges if you have them (you won't if you're careful). The smaller the crack the better this will work. The downfall with epoxy is that even the more 'flexible' G/flex is still stiffer than plastic. When your boat flexes and the epoxy doesn't it creates stress that can break the bond. If you paddle flat water or avoid hitting rocks you should be fine. Using it on harder whitewater is another story, so I went an extra step to make my boat a little more solid. This isn't necessary, but I thought it would be worth a try.

Step 6: Adding a patch. I had a thin strip of plastic that is designed to work as a keel strip on a sea kayak (it's called KeelEazy). I made another batch of epoxy and coated the plastic strip and glued it on the outside of my boat over the crack. Once again, it helps if you heat up the plastic first. I figure this patch will provide a little more strength to help prevent the boat from flexing as much. Also, since my boat is getting old, the spot where the crack happened was clearly weaker and thinner, so I think the extra layer might help me get some more life out of the old girl.

How well will this hold up? I don't know. I'm very confident that my boat doesn't leak anymore. I'm also sure that it can handle some easy stuff - it will make a great teaching boat and a good loaner for beginners. I'll have to get some more time and testing in before I would consider taking it on a remote class V run. Truthfully, I wouldn't take it on a remote run if I have another boat available. Even without the patched up crack, an old boat that's ready to give out is just asking for trouble. But it's fine for many other uses and that's what I'll be using it for.

UPDATE 4/15/15: The good ol' Villain S has been pretty much retired for the past two years, so I can't say that I've done a lot of paddling to test the repair. I've done some teaching out of it and it held up just fine. Recently I took it down an 18 mile class IV wilderness run - an overnighter no less. The first day I avoided the rocks, mostly because I was leading a first-timer down the river, and everything held up just fine. The second day my follower got more confident and I started doing some boofing. Oops. All that really happened is that the KeelEazy patch started to peal back a little. It could be because of the epoxy I used to adhere it instead of the normal adhesive it comes with. More importantly, the G-Flex epoxy patch of the crack held up solidly. After a full day of working it, including a boof onto a rather pointy rock, the repair is still 100% dry and the boat feels strong. I still won't take it on anything hard and remote, but maybe hard OR remote. G-Flex is good stuff.


Sunday, May 19, 2013

Kayak Review - Jackson Karma part 2

I had another day in the Jackson Karma on some harder whitewater and have some more thoughts to add (if you missed my first impressions, that post is here, and an update after a year with the boat is here). This is partly going to be about the Karma but also about hull shapes and paddling in general. In my earlier post I referred to the differences between planing hulls and displacement hulls and how each requires a different style of paddling. I want to get a little more specific with that.

Jackson Karma
First, an acknowledgement. Most kayaks don't have pure hulls. They're not entirely flat or entirely rounded. Even displacement hulls can have edges and some planing hulls look rounder than others. The lines keep getting more blurred but there's still a difference and even if you can't see it you can feel it. It's all about the interaction of the boat with the water. We kayakers just make it easier on ourselves but saying it's a planing hull. We're really describing how the boat paddles more than the exact shape of the hull. It's the performance that we care about.

Karma front view
The term displacement comes from the fact that boats displace water and the buoyant force from that fact is what holds the boat up. All boat at rest are displacement boats. But when you start moving a boat through the water things change. If the hull is flat and there's some bow rocker, then there starts to be a lifting force from the movement of the boat over the water. If the boat moves fast enough then that lift becomes the main force that is holding the boat up - in that case the hull is skimming over the surface and pushing less water.

The speeds required to get a boat to plane are virtually impossible to achieve though paddling alone. Full planing requires the assistance of gravity and that is normally found on a wave. And that is exactly where planing hulls shine - in playboats. When a boat planes it has less resistance, resulting in faster speeds and easier maneuvering. That's surfing.

But this doesn't really happen when creeking. So why would you want a planing hull creek boat? Because that planing nature of the hull can create different characteristics even if full planing speeds are not achieved. (not to mention that people who use playboats a lot are more used to the feel)

Karma side view
All things being equal, when boats are operating in displacement mode a round hull is faster over the long haul than a flat one (check out the bottom of a sprint kayak if you get the chance). But acceleration is a different beast. Flat hulls often are quicker to get up to speed since they ride up over the water without pushing through it as much. Acceleration can be a more important factor than cruising speed on the river.

Another benefit of a flat hull that isn't buried as deep in the water is maneuverability. They can spin quicker. Again, that can be a great advantage on the river. Overall, planing hulls often feel quicker (as opposed to faster). That's makes them good for reacting. The downfall to this freedom is the fact that when the water exerts force on the boat it is more likely to turn. Rounder hulls tend to hold their line better and resist currents pushing them about.

Donnells Run
So let's get back to the Karma. The Karma is a planing hull creeker. I normally paddle the displacement hull Villain. At the end of my last Karma review I stated that I was going to stick with the Villain. That was before I cracked the hull of my Villain (a post on repairing cross-linked plastic boats is now up here). So I took a demo Karma out on a good class IV-V run and learned a bit more about how it paddles.

The first thing that I really noticed was that my timing was off. The river started rather wide and full of boulders. Lots of boofs and rock dodging. The ease of turning the Karma was great and it auto-boofs over most anything. But I was turning and reaching eddies faster than I expected. Same on the boofs - the last couple of strokes would accelerate me faster than expected and I would be late on my final stroke (1:24 in video). I had to realize that I could do less work myself and the boat would make up for it. That's a good thing but something that takes time to get used to.
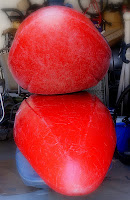
Villain on top; Karma bottom
Both boats bow forward

One of the other things that I was worried about with a flat hull was the landing off of said boofs. Flat hits can be hard on the body and displacement hulls definitely land softer. While I didn't launch off anything that high, I found the Karma never seemed to hit hard. The Jackson folks claim that the design of a narrow bow and lots of rocker allow the boat the accelerate through landings. The picture to the left shows the narrower/flatter hull shape of the Karma (bottom) compared to the Villain (top). I'm not entirely convinced that it will hold true if you manage to catch air and land flat on the middle of the boat, but if you let the nose hit first it does seem to work.

Karma rear view
Another issue I have with planing hulls is that they can be grabby. The water will grab and turn you when you don't expect it. For the most part this didn't happen with the Karma. I never felt the stern get grabbed. But I did feel the bow catch. Not that it was a surprise - I often use holes and micro-eddies to help redirect my boat. Stick your nose in at an angle and let the water move you. With the Karma I was just getting turned a lot more than I expected. Again, it's something that will take getting used to. After several hours in the boat I was doing much better and managed to let the bow lead me through some quick slalom moves.

That's another area where the planing hull shines. A wave is not the only way to get the boat to plane. If you're traveling fast downstream and skim into an eddy where the current is moving up stream, the relative speed of the boat to the water can be enough for a quick burst of planing (0:54 in video). This can give you great control and speed when going through different currents, common when dodging around rocks. This was one of the funnest aspects of the Karma for me that I hadn't really found in class II/III water. It takes class IV boulder fields and some bigger, pushier water to really make the boat shine.

And our river got more gorged up and pushier as the day moved along. I found the firmer edge on the Karma made it easier to control in the big waves and made it easier to use the river to move where I wanted to go (2:18 in video). And as long as I kept my speed up I flew over the holes (1:55 in video). The only issue I had was on a seal launch where I wasn't paying attention and slid into a hole sideways without much speed - got flipped real quick. Definitely user error, but I do think my Villain would have been a little more forgiving. Just means I need to pay attention more.

By the end of the day I didn't feel like I had mastered the Karma, but I had a better understanding of it. And while I still think that the Villain (displacement hull) is the kind of boat that suits me and my paddling, I ordered myself a Karma. Having to figure out a new boat is a challenge and challenges can be fun. It's new and different and that can be scary, but if we don't push ourselves we don't learn and improve. I think the Karma gives me the benefits of the planing hull but in a way that is more forgiving than some of the boats I've tried in the past. Our creeking season is almost over here in California, but I should have a long summer of teaching and a few opportunities to push the boat on harder stuff. A good chance to learn and have it dialed when the winter rains and next spring's thaw roll around.

Tuesday, May 7, 2013

Explore North Coast Gathering

Paddling clubs are a great way for new paddlers to meet other paddlers. They're also a great way to socialize; to share knowledge; to learn about new areas; and to get out paddling more. The thing is, most areas only have one paddling club. So once you know everyone in the club you can end up jones'n for something new. That's where other clubs come in.

Explore North Coast is a club on the (appropriate) north coast of California and they had the brilliant idea of inviting other clubs to come visit for a multi-club get together. This was the fourth annual event but the first time I've made it. In addition to the many locals who were there, quite a few folks from the San Francisco Bay and Redding areas made the drive as well. All told about forty people attended the paddles and evening dinners.

Trinidad Head was the basis for the paddling but my first day was spent north at Crescent City. Normally there's better surf up there but it was pretty small when we arrived. Some took short boats out to play but most of us went around the jetty to paddle through the rocks on the north side. The highlight was a pair of whales that were hanging just off the jetting, popping up every minute or two as if they had no place in particular to go. It's always cool to see such large creatures up close in your little kayak.

The next day most everyone launched from Trinidad, some into the surf on the outside and some on the protected beach on the inside. We all met up but soon split into smaller groups depending on the objective. Our group ended up going just a little ways to College Cove. We found a couple play features but mostly we were looking for surf. We found some nice small waves that gave us some lengthy rides before ending up on the rocks - luckily they were small enough to pull off before you ended up in the rocks.

The weekend was a great combination of casual events. Whether you were a new paddler just getting introduced to the ocean or an experienced rock gardening looking for new waters to explore, the Trinidad area has everything you could want. And not surprisingly, the locals are warm and friendly and arranged for the best weather for their guests - we had an all time record high of 88 deg. on Saturday!

Enjoy some nice pictures while I edit the video: Picasa photos.

UPDATE: here's a quick little video from the Crescent City paddle: